I’m writing my first Cordova / Ionic Android and iOS app, and ran into an issue when submitting to the iOS app store. In order to submit your app, you need screenshots. And not the “minimum of 320px on the longest side” type of screenshot where you can submit almost anything, but the “must be exactly X and Y dimensions” type where you need (up to) 5 screenshots per device type.
This was a problem for me, because while I have a Mac, it’s slow as a wet week. It’s a 2009 unibody Mac that I bought off eBay. I went for the cheapest Mac I could find because I just needed it to deploy to my test device (an iPhone 4 I also bought off eBay) and fire off production builds when I was ready.
Because it’s so slow, running the simulator on it is nigh on impossible. It takes forever to start up and click on stuff, so I ruled that out. I then came across snapshot, part of the fastlane set of tools. This would let me create a new UI test, then edit the code to take snapshots when I needed to. It still relied on the simulator in the end, but it was automatic, so I could let it run overnight.
But I had to rule that out as well, because Cordova apps aren’t fully supported. I’d click on some elements in my app while recording a UI test, and they’d just get logged as generic ‘element.tap()’ events that did nothing when played back. Plus it required changes to the xcode project that would have just been overwritten when I next built the app, unless I wrote a hook to make this stuff for me. With no (easy) way around all that, I turned to “faking” the screenshots using a browser.
Google Chrome (and in fact, almost every other browser out there) has a set of developer tools that can emulate various screen sizes. The iPhone 4 emulation is nearly pixel perfect compared to an actual iPhone 4, so I decided to go for that. I fired up Ionic’s “ionic serve” command (or Cordova’s equivalent) and went to town.
iPhone 4 on the left, custom size on the right. Whoops!
The problem is, the size required for the 3.5″ screens is 640×920 and Chrome’s iPhone 4 preset gave me screenshots that were half that size. So I added a manual preset that was 640×920. But then my previews were off, because media queries kicked in and it was showing my app differently to how it really was.
Zooming did nothing in Chrome, and overriding the media queries was going to be a not-worth-the-hassle type of difficult. So I turned to Firefox.
Firefox gave me some success, because I could set a custom size, then zoom the window in 200% so in theory, I’d have a window size of 640×920, but the content doubled in size to negate the media queries. But when I clicked the screenshot button, I got a screenshot that didn’t honor the zoom settings in the way I expected, so I was left with a screenshot that was 320×460.
After literally hitting my head against the desk and trying six different screenshot tools, and thinking I’d have to resort to using Windows’ screenshot button and stitching the results in Photoshop, I finally nailed it.
There’s a second screenshot button in Firefox’s dev tools. You have to turn it on under the settings menu, but it gives you a screenshot of the viewport as it actually appears. I finally had a way to get screeshots at the correct resolution AND the correct view!
Now I was left with one last minor issue: How do I quickly sort out the screenshots?
So I did what I do best – Write a script to automate that shit!
Just run that in node.js (in the same folder as your downloads) and start taking screenshots. Anything it finds, it’ll compare the image dimensions and shove everything into the right folders.
A few minutes later, I had all the screenshots I needed and I was able to submit my app for approval by the end of the night. Ahh progress!
As you might have seen from my last post, I’m writing an aurora hunting app using Cordova and Ionic
, and it’s taught me a fair bit about other platforms and what it takes to write an app. I’ll update this post every now and again, but here’s a few things I’ve learned during the last 6 months writing my first app:
I’m using Ionic to write the app. As I learned AngularJS last year as part of another project, I’m very comfortable writing controllers, filters, services and so forth. I’m also loving Ionic’s “all in one” methodology, as you can do push notifications, sharing beta versions via email, and all that other good stuff.
Regarding Apple
I’ve got mixed feelings towards Apple. They make great hardware (if not underpowered compared to other laptops & desktops), and OS X is nice to use, owing to it’s Unix history (so a lot of tools I use in Linux are available), but the hardware is expensive and the extent to which everything is locked down, is frustrating.
To test an Android app on a real device, you just plug it in via micro-USB and run ionic run android after downloading the free SDK. A minute or two later and you’ve got your app running. If you don’t have an Android device, you can slip down to almost any store (here in Australia, they sell phones at the post office, the supermarket and other “nearby” places) and buy yourself a cheap Android phone, or you can fire up an emulator and use that. It’s really painlessly simple
To test on an Apple device, you need to buy an iDevice AND a Mac AND subscribe to Apple’s Developer Program. I bought everything second hand off eBay, so I was out $120 for an iPhone 4s, $175 for a 2009 (slow as hell) Macbook (and $30 for a charger, as it didn’t come with one) and $145 (a year) for a Apple Developer subscription. All that so I could test my app on a real device. Sure I could have done it on a simulator, but I’d still need a Mac and a developer subscription. For a developer with close to zero budget, it was a tough sell.
Once you’re ready to test, you need to run ionic build ios and then in Xcode, pick your device and run. It’s a more in-depth process than Android’s single command on literally any computer you have handy.
Complaints aside, I love how easy Safari’s remote web inspector works. Turn on developer mode in Safari, go into the settings for Mobile Safari and turn on the web inspector, then in the Developer menu in Safari, you can remotely inspect your app and check the console for errors, which came in extremely useful, as you’ll soon see.
Plugins vs. Native
My app worked great on Android and web, but failed on iOS. When it boots, it’s supposed to get your current location, then pass that to my API (for weather and aurora visibility) which returns data to Angular for use in the app. I had error callbacks throughout the process, but none of them were firing, so I assumed it was some security feature of Apple (namely App Transport Security, which was odd, because my API was using https).
After putting dozens of console.log() calls everywhere, I realised that my code was silently failing when obtaining the user’s location. This was due to me using the browser’s geolocation features, instead of relying on a Cordova plugin. Once I had that figured out, everything worked.
I also ran into this issue when I moved development from my Windows PC to my Macbook. Simply running npm install doesn’t install the plugins — you have to run one of Ionic’s state commands (e.g. ionic state restore).
In addition, running commands such as ionic plugin add com.example.plugin doesn’t persist that plugin, so be sure to add the --save parameter to the end.
Push Notifications
This is an area where you really have to get things right. Users can tolerate some bugs here and there, but when they receive more or less push notifications than they were expecting, that’s an instant uninstall, especially when it’s for stuff like aurora notifications, where timely notifications are crucial.
My first stumbling block with push notifications, was getting them to actually run. Turns out that I had the wrong API key from Google Cloud. You need a SERVER key, not an ANDROID key! Big difference! As soon as I had that set up and fed into Ionic’s dashboard, push notifications worked in a heartbeat. I also needed to generate a development push notification certificate, install it onto my Mac, then rebuild my app with that certificate, just so push notifications would come through. Yikes!
Eventually I’ll migrate push notifications over to GCM and APN, because Ionic’s free plan gives you 50,000 push notifications, then it’s nearly $700 AUD a year for 1.5 million pushes, and with zero budget, POSTing out the info for free seems much better, and a job perfectly suited for my API.
The next hardest part was actually triggering the notifications automatically. “All three” providers (Ionic Push, GCM and APN) make it easy enough to send out notifications (Apple require you use your own certificate in place of an API key which curl can handle), but I needed a way to automatically send out push notifications when an event is likely to happen.
This is still a work in progress, but essentially uses (will eventually be able to) set a minimum Kp alert. Every two minutes, the Kp in an hour is checked. If it’s above the minimum, they get an alert. If the Kp increases by an amount within the user’s specified timeframe (10 minutes during testing), they get another alert. Otherwise, nothing happens until the Kp dips below their minimum. This stops a ton of notifications coming through every 2 minutes and hopefully makes for a better experience.
I plan to expand the notification system to use other metrics, such as the “three” (Speed, Density, Bz) or NOAA’s text-based prediction, or possibly a hybrid auto / manual system, but for now, push notifications are the last major hurdle before release.
Dose of Double Darkplace Dex Medicine
Eventually, I hit a rather major stumbling block that put me out of action for a week – I was reaching the “64k method” limit. Whenever I’d try and build my app, it’d fail, spouting something about a dex method overflow or something. The “native app answer” was to enable multidexing, which I could do by putting a “build-extras.gradle” file in my platform directory and enabling multidex that way.
This felt rather.. unclean, as I’d have to do it every time I had to remove and add the Android platform, and I just want commands like ionic state restore to just work and get everything ready for buildin’.
That’s when I found this lovely little plugin that does all of that for me, and has the benefit of being a plugin so whenever I state restore, everything is automatically done.
Now my apps build again, and there’s only been a 2mb file size increase, which I’m sure I can bring down by tweaking some resources and such.
Name the app
Another big stuff-up I came across, was the naming of my app. When you create a new app in the Google store, the package name is set indefinitely as soon as you hit “publish”. I didn’t realise this until I created and uploaded the first (alpha) version of my app with the package ID com.ionicframework.appauroraslive562273. I went in and changed it in my config.xml, but Google rejected the file because the package name was different. I tried to delete the app, but after you hit Publish, even if it’s just a closed alpha test and nobody has been invited in yet, you can’t delete the app. You can unpublish, but not delete.
So now I have an app in the list called [REMOVED]. It’s an eyesore, but the best outcome I could get, so rename your app BEFORE uploading it to the store, even if you’re just alpha testing!
Handling multiple versions
I plan to offer two versions of my app – A free, ad supported version, and a paid, no ads version. Code-wise, the two are identical. I’ve used a Cordova plugin to detect the package name, and if it matches the free version, display ads. I manage the two code bases by having three branches in GitHub: “master”, “free” and “paid”.
Master is where the majority of the work is done. I build and test using this version. When I’m happy that everything is running smoothly, I create pull requests and merge those changes into “free” and “paid”.
I’ve got my config.xml set up in such a way, that I can easily bump versions and add new plugins without changing the package name, so when I run a build on the two branches, the package and app names remain untouched.
I can confirm that everything is good, by comparing the “master”, “free” and “paid” branches. If the only thing that is different is the package name and app name, then my code is 1:1 and ready to go.
Final Thoughts
Ionic makes it SO easy to get into app development. They offer a great AngularJS based framework that has a native app feel, Angular bindings for common Cordova plugins and a nice extension of the Cordova CLI.
But their platform is where it really shines. They have step-by-step tutorials on how to sign up and prepare your Apple account (which isn’t immediately obvious to someone who doesn’t develop apps for a living, or has never worked with Apple software in the past), then a spot in their dashboard where you upload your generated certificates, API keys and such, then sections for analytics, push notifications, user tracking and such.
They’ve really done a great job making app development and deployment easy. Shame about the high cost, but I suppose if you need to send out more than 50,000 pushes a month or have more than 5,000 users, your app is no longer considered a hobby?
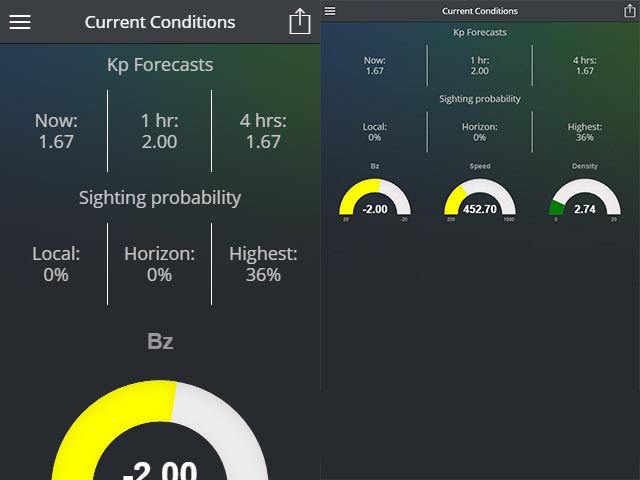
Things have been rather quiet on the photography front, but they’ve been super busy on the programming front. I’ve been writing my own app for the Pebble smart watch. The watch app, which is a miniature front-end for my new aurora hunting website, Auroras.live, is written in Pebble.js using CloudPebble and was tons of fun to create.
You can grab a beta version of the app from the store. It shows you the current weather for your location, tiny coloured gauges for speed, density and Bz, plus current, 1 hour and 4 hour Kp readings, and a three day Kp forecast that also shows up on your timeline.
I’m also working on an Android (and possibly iOS) mobile app, based around the Auroras.live website. It’s not ready to go yet, but I hope to have it done by mid-year, earlier if possible. This’ll be my first official foray into writing a mobile app, so it’s all very exciting.
As of late I’ve been doing a lot of aurora hunting, often heading off to the coast at a moment’s notice to try and catch the green and red dragon. Though I’ve been successful once, and had a few “near misses”, it’s been fun, and I’ve learned a lot about the sun, the earth, as well as the various satellites floating around earth (in particular the ACE space craft and it’s awesome near realtime data that makes sites like Aurora Services as well as apps like my own app-aurora for the Ninja Sphere possible).
I’m also a member of the Aurora Hunters Victoria Facebook page, where people share info and photos, plus tip each other off about upcoming auroras. On the page I’ve seen a bunch of questions from newcomers, and thought I’d jot down some of my own learndings about auroras. I’m no expert, so a lot of my info may be way off, but this is based on what I’ve read and experienced.
What causes an aurora?
The sun is not a uniform ball of gas. It’s much like a gigantic fiery ocean, with waves and such. When a large wave occurs, the sun spews out solar particles. If the particles are heading towards earth, the right conditions could cause an aurora due to the particles causing disruption to the earth’s magnetosphere. My experience shows that there are three key metrics for an aurora: Particle speed, particle density and Bz, all three of which, we’ll discuss later.
Predicting an aurora is hard, because the sun is so unpredictable. You might see 3 day aurora forecasts, but the most accurate predictions occur about an hour prior, as that’s when the particles hit the ACE spacecraft and the info reaches earth. The forecasts are usually worked out by watching for telltale signs of the sun getting ready to spew out particles. There’s no spacecraft closer to the sun and if there were, the particles might scatter out too far, mostly missing the earth, which would still make predictions inaccurate.
A lot of sites use a Kp index to determine or predict aurora “strength”, but this isn’t the best way to determine activity, as I’ve personally witnessed an aurora out at Inverloch that was Kp 5 at it’s strongest, and Kp 7 at it’s weakest. As mentioned above, Speed, Density an Bz are your three keys.
So in short, you can ask “will there be an aurora on X day of the month”, but know that the answer will be as accurate as asking “will it rain on the 12th of December in three years’ time?”. Best bet is to watch sites like Space Weather to work out when solar flares are going to happen and where they’re directed.
Speed, Density and Bz
These seem to be the key three for seeing an aurora. The theory behind them goes something like this:
Speed
Speed is like throwing a baseball. The harder you throw, the more damage it does when it hits something. The faster the particles are travelling, the brighter they’ll be as they smash into other particles in our atmosphere
Density
No, I’m not talking about Lorraine McFly (nee Baines) from Back to the Future. The more particles (i.e. the denser) that hit earth, the more intense the show will be. Going back to our baseball analogy, throwing a thousand balls looks cooler than throwing a handful
Bz
The ‘z’ is an orientation. There is also Bx and By, but generally aurora information sites don’t really worry about those. They’re available from the ACE spacecraft data site if you want to find out their values, but I don’t know how important they are. I’m still wrapping my head around Bz, so I’ll update this when I get a grasp on it, but Dartmouth’s “A Guide to Understanding and Predicting Space Weather” says:
The most important parameter is Bz, the z–component of the sun’s magnetic field. When Bz goes negative, the solar wind strongly couples to the Earth’s magnetosphere. Think of Bz as the door that allows transferring of significant amounts of energy. The more negative Bz goes, the more energy that can be transferred, resulting in more geomagnetic activity
Basically, the more negative Bz is, the more solar wind can get through and put on a good show.
Location and time
Finding a good spot is relatively simple if you’re just there to shoot the aurora, and don’t care what foreground features are present. Simply find the darkest, most southern (or highest, if you’re too far away from the coast) spot you can find, and point your camera south. Because the sun does what it wants, the particles could hit at noon. You obviously can’t see an aurora during the day, in the same way that a torch is less effective during the day, so if a big storm hits during your lunch break, ain’t nothin’ you can do about it.
If you’re located in the city and aren’t sure where to go, use Google Maps. Open it up, find your house, then look for remote spots away from towns, major roads and such. I live near three power stations so I have to travel a bit to get away from their warm glowing warming glow.
If you’re heading out somewhere new or remote, take a friend. Most non-astronomically inclined friends would be overjoyed to accompany you in the viewing of lights in the sky.
If you’re still not sure where to go because you exist in a world without Google maps (hey, it could happen!), then lots of people go coastal, to places including the Flinders blowhole, Cape Schanck, Inverloch, Cape Patterson and the other side of Melbourne to places along the great ocean road. Basically, if it’s dark and near the cost, it’s a good place.
Photographing the Aurora
Asking what exact settings to use is like asking how much fuel you’ll need to drive to a random spot in Melbourne from a random spot in Victoria. You could give a ballpark figure, but if you wanted a more exact number, you’d have to think about traffic, roadworks, alternate routes, stopping for maccas, fuel economy, tank capacity and so on.
What you should do, is practice beforehand. Go outside and shoot the stars. Know how the street lights affect your shots. Know roughly what your camera settings do and don’t be afraid to experiment. Digital storage is cheap, so just keep hammering the shutter and dicking around with the settings on the camera until you get something good. Here’s what you’d need to know at a minimum:
Shutter Speed
This is how long your camera lets light in. The longer it’s open, the more light gets in and the brighter your photos are. You need to remember that the earth is constantly moving, so if your shutter is open TOO long, you’ll get star trails which would make your photo look blurry. This can be partially resolved with..
ISO
ISO is the digital equivalent of film sensitivity. ISO determines how sensitive your camera is to incoming light. Set it low, your image will be darker. Set it high, your image will be brighter, but will also get noise (graininess). You can probably already see the relationship between shutter and ISO. Shooting the night sky is about finding the right mix.
Many lower-end cameras might have a maximum ISO of 3200 or so, while higher-end cameras can go up to 64,000. Newer cameras have better noise reduction, so the graininess isn’t as pronounced on a newer camera as it is on an older one.
Aperture
This is another “light determining” setting (which, face it, photography is all about controlling light). Your typical lens has a set of blades inside which form a circle. Remember the intro to James Bond movies with Bond shooting at the camera? The black surround is what aperture blades look like. They open or close to let more or less light in, and are like the pinhole on a pinhole camera.
Aperture is referred to as “f-stop”. If you see f/4, the aperture is wider than f/16. The higher the aperture, the sharper the photo (due to light bending) but also the less light that gets in. For shooting at night, you generally want this “open” (at it’s lowest number). If you’re shooting epic exposures (30 minutes+), you’d want to bump up the aperture, but practice lots beforehand
A good practical demonstration of aperture, is to put your index and middle fingers together, open them slightly, and peer through the gap. The scene might look darker, but it might also be sharper.
JPEG vs. RAW
Many DSLR cameras have the option to shoot in JPEG or RAW. Both have their advantages, but if you’re new to photography, I strongly suggest you shoot RAW + JPEG (grab your camera’s manual and look it up), for reasons I’ll explain. If you’re getting better with your camera, switch to RAW exclusively and don’t look back. I don’t recommend you shoot JPEG only.
JPEG
A JPEG is just a standard old image. Most images you view online would be JPEG, as it’s perfect for photos — it’s standardized, shrinks down well, can be opened on almost every computer in the world and can have variable quality, so a massive image can load rather quickly. The downside is that it’s what we call “lossy” — whatever is saving the file has no real qualms about tossing out information. That information could be merging 100 shades of red into 1 “close enough” red, or it could be a small detail in the background that nobody would look at.
RAW
RAW is a generic term that refers to file types such as CR2 (Canon), NEF (Nikon), ORF (Olympus) PEF (Pentax) and ARW (Sony). It’s basically the untouched image from the camera’s sensor. With a JPEG, as soon as it’s converted, you lose quality as mentioned above, whereas RAW is “lossless” and retains all information. RAW is supported by major apps like Photoshop, Lightroom and others, plus many online services such as Google Photos. I believe Windows 10 is starting to support it natively too. Sure the file size is bigger (up to 20+ times in some cases) but it’s worth it, because you can (to a certain extent) bump up or tone down the brightness, use them in HDR photos and even fiddle with white balance. And with most RAW formats being 12-14 bits, they can hold between 4096 and 16384 shades of colour, compared to JPEG’s paltry 256 colours. So if you’re not shooting in at least RAW + JPEG, put your camera away, please. Your hard-drive might groan, but your future-photographer-self will thank you for it. I speak from experience! 🙂
White Balance
Frankly, white balance is of little importance to me when shooting RAW, as I can simply change it later in Photoshop or Lightroom. The only time it matters to me, is when I want to see how the image looks on the back of my camera. Otherwise I’ll just ignore it. White Balance determines how warm or cool your photo looks. It’s also called colour temperature and it’s measured in Kelvins, with lower values meaning bluer photos, and higher values meaning more orange photos. Generally, just shove it on auto and fire away. Changing white balance in Lightroom doesn’t ruin your photos, so don’t panic too much about this.
Shooting Mode
Anything other than Auto. Anything other than Auto. Anything other than Auto. Anything other than Auto. Anything other than Auto. Anything other than Auto.
Got that? If you shoot an aurora in auto mode, you’re gonna have a bad time. I highly suggest manual. Sure it might be a bit complex, but you’ll have the most control and will be able to quickly set everything up for hassle-free shooting. If you’ve fiddled with your camera settings enough to know what each do, then manual is a piece of cake!
Focusing
Focusing doesn’t work in the dark. Full stop. Well it kinda does, but it’s like trying to hit a squirrel with a stone in the dark. Possible, but difficult. The best trick I learned (which came from Royce Bair’s excellent book on astrophotography) is to focus before you leave home. Point your camera at something distant and focus on it (e.g. a house down the road, the other end of your loungeroom etc.) and mark the spots with masking tape so you can easily see where you were focused. If you couldn’t plan that far ahead, get a friend to stand a bit of a distance away, pointing a torch at themselves. Focus on them, then slip your camera into manual focus to avoid hitting the shutter and losing your spot.
Tripod
Bring a tripod. That should be an “uh duh!” moment, but I’ve left home without my tripod connector before, meaning it was as good as resting my camera on a moving animal. If you find that you do forget your tripod, rest your camera on a flat rail, or prop it up with a rock or stick. Just be extra careful, as you’re more likely to drop or step on your camera
Actually shooting the aurora
I have a “favourite” setting when shooting the night sky. It usually works out to be ISO 3200, 15 second shutter speed and aperture set as open (low) as it’ll go (f/4.0 on my lens). That is slow enough to let light in, but not slow enough to cause movement. ISO 3200 ensures I don’t dip too low, while keeping my images as noise free as possible. If I catch you blindly setting these settings without knowing why you’re doing that, I’ll slap you, as these settings work for me sometimes, but if you’re closer to light pollution or in the middle of nowhere, your settings will need to change.
Shooting the aurora is as simple as setting your desire settings, pointing south and shooting. If your settings are correct, you should easily be able to see an aurora. If not, check your aurora data to ensure the aurora is strong enough to be photographed. And double check that you’re pointing south. Even if you’re staring across the water, you could be in a bay facing back towards land. I know this from personal experience out at Cape Liptrap.
What an aurora looks like to the naked eye
When you view the aurora with the naked eye, it’s not as pretty and red or green as it looks in your photos. This is basically because of the wavelength of red and green and detection by the human eye. When I first saw the aurora after pulling up at Inverloch, it looked like light pollution in fog off in the distance. It was an extremely dull greeny orange. Then when I saw the beams off to the right, they looked like people standing in fog shining odd shaped, slightly reddish lights in the air. I knew not to trust my eyes, and sure enough, my first photo yielded a blast of pink and green colours.
Links and stuff
Everyone likes links! So here’s a bunch that’ll help you become a better photography-type-person. Here’s some great links:
Education
The Arcanum – This site is a paid site (roughly $70 a month) but puts you in a group led by a world class photographer. You complete photographic challenges and “level up”. You also get access to the Grand Library, which is hundreds of videos about everything photography, from how to shoot a wedding, right down to how to calibrate your monitor to get perfect prints every time. I’m a member and it’s been good value so far.
Books
My review on Milky Way Nightscapes by Royce Bair – This book is incredible. It takes you through photographing the night sky, setting up foreground elements, post-processing and lots of other great tips.
Cressy Aurora Cam – A webcam in Cressy, Tasmania that shows an almost 180 degree view of the sky and can show you when an aurora is happening. Check out the sample image to compare
Auroras.live – A website of my own creation. Shows you at a glance aurora conditions.
Saying thanks!
If this post is helpful for you and you want to give back, there’s a few ways you can do it:
Share this post with your friends. Scroll to the bottom and find the share icons.
Follow me on one of my social media accounts. I’m on Facebook, Google+, Instagram plus plenty more (just search for davidgrayphotography wherever photos are found!)
Check out my store. I have prints, cards and other cool stuff for sale: davidgrayPhotography
Help me cover server costs through PayPal or with Bitcoin: 34agreMVU8QeHu4cLLPkyw5EYdSKp6NqTV
The TL;DR version
This has been a long post. Probably much longer than any other post I’ve written, but I did it to help people learn more about their camera, while learning a bit more about auroras. Here’s the rundown if you’ve got the attention span of a creature with a small attention span:
Fiddle with the settings on your camera. All cameras have a “factory default” setting, so don’t be afraid to explore and learn about what each setting does
Learn about ISO, shutter speed and aperture. Shutter = how much light is let in, ISO = how sensitive your camera is to light, aperture = F-Stop and is like a pinhole camera. Bigger pinhole, more light.
Focus your camera before you leave home, put a piece of tape on your focus ring so you know where to focus when you’re in the dark.
Use a tripod. Don’t have one? Any flat, steady surface will do, but be careful. It’s your camera!
Shoot RAW. If you don’t wanna, shoot RAW + JPEG instead. Shooting JPEG only is like taking a photo of a Picasso masterpiece and trying to print it — it’s gonna come out “alright”, but it could be SO much better.
Digital storage is so cheap, so don’t be afraid to take lots of photos and experiment.
Head south. As far south as you can go. Can’t get south? Get up high.
Go somewhere dark. Where? Get out Google Maps and look at your home, then move around until you find somewhere that’s away from major roads, away from towns, and preferably behind a hill (as hills block out lights really well). Take a friend. It’s lonely, spooky and potentially dangerous out there.
It’s difficult to predict an aurora. A meteorologist can’t reliably predict the weather, nor can space weather sites. Accurate predictions are accurate up to an hour in advance, but keep an eye on space weather sites, as they often report potential solar activity, which could, with the right conditions, lead to an aurora.
ISO 3200, f/4.0, 15′ Shutter speed. Those are my “starting out” settings, but don’t just blindly use these numbers. Find out what they mean and tweak them to your conditions
I just had a colleague come in who had taken lots of photos on holiday but was unable to find them after an occasion where they went into the menus to try and fix an issue after the camera was dropped I ran my favourite utility, PhotoRec, and we realised that the photos were gone entirely, with little explanation as to why. I suspect she had overwritten the files by taking more photos, which is a data-recovery no-no So with that in mind, here’s a quick post giving a simplified and brief explanation of how media storage works and what you can do in order to prevent your own photographic catastrophe . This isn’t a how-to for PhotoRec / TestDisk, as there are plenty of tutorials out there for that.
In the digital world, speed is important, and storage controllers (that is, devices that read and write to your storage) take shortcuts to ensure things keep zooming along. For example, if you move a folder between two spots on the same disk, the controller isn’t going to spend forever physically moving your files, bit by bit. That would be like moving a house, brick by brick. Instead, a storage controller does the ol’ switcheroo, taking the label off your folder, and giving you the label of another folder instead. The folder hasn’t moved, but to anyone looking at it, it has, because the label has changed. This is why you can move 100gb of movies from one spot to another on your disk in seconds, but copying them over for a friend takes hours.
Digital storage also takes these sorts of shortcuts when dealing with deleting files. In order to delete a file properly, you need to overwrite it with 0’s. But if you have a 4gb movie, that’s a lot of 0’s to write. So what the controller does, is mark the file as deleted. It’s still physically there on the disk, but the system ignores it, because it’s been told that the file has been deleted. When a new file comes rolling along, it moves over the top of the deleted file, so it’s finally deleted.
As you can see, this makes file recovery easy with a tool like TestDisk which ignores the system saying “Nah, this file isn’t here” and makes a copy of the file on another disk, because the file is still there, but it’s just been marked as “invisible” essentially. As you can also see, if you keep shooting, you’re overwriting the “deleted” files, and you have almost zero chance of getting those files back. Even if you don’t take a photo, your camera might still perform some kind of maintenance which causes data to be written to it, and you obviously don’t want that.
So if you’re on holidays and your card stops working, just eject it, pop it in your bag, pop in a second card (you do have one, right?!) and keep on shooting. Unless your card is snapped in two or burned out or in the mouth of a dolphin you were taunting, there’s a good chance you can get your files back
The image at the top of this post is one I took in Sydney back in 2013. I had to recover this, along with a ton of other files with TestDisk because I had accidentally formatted the card, not realising that I didn’t have the photos stored on my PC yet.
So the TL;DR version of this post is:
If your card is cactus, eject it immediately. Don’t write to it!
Take it to your nearest willing IT guy as soon as possible, or use TestDisk / PhotoRec to recover it if you know how
Make sure you carry many cards with you, just in case one dies. Storage is so cheap, you have no excuse!
Keep backups of all your files and import them onto your PC as soon as you get a chance! Even if it’s just one photo, back it up! Your daddy taught you good, right?
I’m doing a 365 challenge at the moment. A photo a day for a whole year. It’s been fun, except when it comes to Facebook photo management. I didn’t realise until about 100 days in, that Facebook was lumping all of my photos together into one post. People visiting my page would see nothing, except for “David Gray Photography added 100 photos to the album ‘365 Challenge 2015′”. This was very frustrating, because I was working my butt off to post content, but Facebook wasn’t showing it. I resorted to “double-sharing” my post. I’d upload the photo, but tick “Hide from News Feed”, then I’d go to the photo, hit “Share” and share it with my own page. It seemed to work, but I knew there had to be a better solution.
After some more research, I discovered that there is a “Change Date” button in the uploader. By default, Facebook sets the date of the photo to the date you created the album (i.e. January 1st). This might work for photos of a birthday party or a wedding, where it all happens on the one date, but for a steady stream of pictures over the course of a year, it was not good.
Fortunately, Facebook gives you an option to set the dates after upload. To do it with 180 photos would take forever, so I created a bookmarklet which would find and store the month and day (Facebook gives you this info as a tooltip, which is very handy), simulate a click on the “Change Date” link, set the day / month boxes as necessary, simulate a click on the “Save” button, then simulate a click on the “Next” button. This essentially allows me to repeatedly click to set the date for all of my photos. 100 photos in, only 90 to go. Too easy!
If you’d like to use this bookmarket for yourself, drag the link below, up to your Bookmarks toolbar:
If you’d like the source to inspect and change, check out the JSFiddle. As this was written for myself, the code is going to be messy and all over the place, but I didn’t have time to write neat code.
If you’d like to turn the source into a bookmarklet, or you’d like to write your own, check out this bookmarklet generating site. Put some code in, hit “Convert” and you’ve got a bookmarklet, ready to drag to your toolbar. Just note that Facebook blocks external scripts, so you can’t use jQuery on code destined for Facebook.
Last night I printed what has arguably been my first useful thing on my Buccaneer. I came across this lens cap holder a little while ago, but didn’t think to print it until last night. I needed to change the dimensions, so I took the Thing into Thingiverse’s customizer, adjusted the parameters, save it to my account, then printed it.
“Customizer” is a feature on Thingiverse that lets you easily modify certain objects. For example, the lens cap holder let me change the strap width and lens cap diameter without needing to touch any other programs — I simply typed into the text box what my strap’s width was (38mm) and what my lens diameter was (77mm) and it gave me back a file that I could shove straight into the Buccaneer app and print. There are plenty of other customizable things out there, from music boxes to luggage tags and almost everything else inbetween.
The cap holder was incredibly tough to get on (and off) my strap, as there was literally no wriggle room, so next time I might try 39mm wide instead. As you can see from the image above, I eventually managed to get the holder on, and get my straps back on in the right orientation, but it took a fair amount of struggling and bending to get it on there!
Last night I 3D printed a model of a Canon EOS 5D Mark III. It took roughly 8-9 hours to do on a reasonably high quality setting. I’m really pleased with how it turned out. The resolution is so good, you can actually see the ridges on the wheel near the shutter (on the left-hand side of the photo) and the individual buttons on the rear of the camera (not shown). The bottom is quite “rough” from where I had to snap away the supports (that kept the lens from sagging while printing) but overall I’m impressed.
This also gave me a chance to play with the “infill” setting in the latest version of the Buccaneer 3D printer app. When printing, the printer adds in a honeycomb-like structure to the inside of the print to make it sturdier (so the inside is not completely hollow, but it’s also not completely solid) and most 3D printers let you pick this percentage. The higher the percentage, the sturdier your print will be (with less chance of roofs caving in, as was the case with my TARDIS test print), but the slower it’ll print and the more plastic it’ll use. The default for the Buccaneer is 20%. I dropped it down to 15% which shaved some time and filament use off the printing total.
My next print is going to be a “davidgray Photography” sign for an upcoming art and craft market. I’ve designed it myself in Sketchup and saved it as an STL in Microsoft’s 3D Builder app so we’ll see how that goes!
In the book, it goes over many things, including how to remotely compose your shots before you even leave home (using free or cheap software such as Stellarium, along with Google Maps), post-processing using Adobe Camera Raw, lighting the foreground with a variety of lights (and even includes formulas for calculating light intensity and such) plus ideal camera settings for various print types.
If you have $20 USD and a keen interest in astrophotography, it’s well worth a look. The weather has been rather terrible most of the last week, but we’ve had some great weather this weekend, so I’ve had more chances to get out and put into practice what I’ve been learning. I’ve still got a long way to go, but I’m slowly getting there!
EDIT: Want to see the failed print in action? Video at the bottom of this post!
The Buccaneer sitting pretty, filament loaded, ready to start printing.
After almost a year and a half of waiting, I finally received my Buccaneer 3D printer. The printer, which was funded with Kickstarter, has experienced delay after delay, a fairly high number of staff joining and leaving, plus the ever growing angry backer crowd who were annoyed by lack of communication, delays in refunds, removed features and not knowing for sure when they were getting their printers. But those issues aside, was it worth the wait?

 There’s a second screenshot button in Firefox’s dev tools. You have to turn it on under the settings menu, but it gives you a screenshot of the viewport as it actually appears. I finally had a way to get screeshots at the correct resolution AND the correct view!